DMXIS / D-Pro Online Fixture Database
Creating a new fixture - in detail
Creating a fixture is basically a case of copying the DMX info from your fixture user manual into the editor. However, as there's no industry standard governing the implementation of DMX control, manuals can vary wildly in terms of quality and readability!
Learn your fixture!
There is no point in diving into the online fixture editor until you understand exactly how your fixture works. Every fixture operates differently, and it's critical that you first digest the DMX information contained in the user manual. You may also find it helpful (if you have the physical fixture to hand) to try manually controlling it using basic faders, in order to learn & understand its operation.
Although fixture operation varies wildly across manufacturers, there are there are some basic DMX concepts common to every fixture manual:
DMX operating modes
Fixtures often have a number of separate DMX modes, selectable from the fixture's control panel. For example, a basic LED spot may offer:
- A 1-channel "dimmer only" mode
- A 3-channel "RGB" mode
- A 5-channel mode with RGB and strobe control
Which mode you choose is up to you. Simpler modes are easier to program, and consume fewer channels on DMXIS or D-Pro (an important consideration if you have a larger rig). Complex modes offer more features, but are more time consuming to program.
The fixture editor allows you to create multiple modes for each fixture, so you can support every mode offered by the manufacturer. If you are creating a fixture for your private use (i.e. NOT published and available to other users) you may decide to only implement the modes you need. If you plan to make your fixture available to other DMXIS or D-Pro users, please consider implementing all available modes.
DMX channel map
Each fixture mode has a number of channels. Each channel is typically responsible for controlling one aspect of the fixture - for example, a channel might dim the fixture, set the strobe speed, or choose a gobo.
Some aspects of a fixture may consume two or more channels. For example, high resolution pan of a moving head uses two channels (usually labelled coarse & fine in the manual). RGB control of an LED fixture uses 3 channels (for independent mixing of red, green and blue).
A minority of fixtures on the market choose to control multiple functions onto a single channel. While this is (in the author's opinion) bad practice, and ultimately makes the fixture harder to program, the fixture editor and DMXIS & D-Pro can handle such devices.
DMX channel definition
This is where things get interesting, and sometimes confusing.
Each DMX channel can be set to a value in the range of 0-255. For a straightforward channel like a Dimmer, the value 0-255 simply sets a variable level (e.g. Dimmer=64 means 25% brightness).
Other DMX channels can control fixed features. For example, a Mode channel might switch a sound-activated feature on & off (e.g. Mode=0 means OFF, Mode=255 means ON)
Often, you'll find fixtures mix variable and fixed controls in a single channel. For example, a Gobo Rotate channel might be:
- 0-50 == Stop (fixed value)
- 51-110 == Rotate Clockwise (variable value, higher values == faster speed)
- 111-140 == Stop (fixed value)
- 141-230 == Rotate Counter Clockwise (variable value, higher values == faster speed)
- 231-255 == Stop (fixed value)
The fixture editor supports any mix of fixed and variable ranges within a single channel
Summary of concepts
So, your fixture manual should contain a list of operating modes. Each mode has a channel map, and each channel has a channel definition consisting of one or more fixed and variable ranges. Once you have this data, you're ready to transcribe it into the online fixture editor.
Creating a fixture - detailed walkthrough
Check if the fixture already exists!
First, take a look in the public fixture database. Does this fixture already exist? If so, then please consider NOT creating an additional public fixture with a slightly modified name! If the existing fixture does not meet your needs, use the comments system to report the problem to the author. Ultimately, it helps no-one if the fixture database fills up with duplicate fixtures.
Of course, you are welcome to create as many private fixtures as you require.
Create a blank fixture
In the My Fixtures Window, click on New. This opens an empty Fixture Editor window.
Choose the manufacturer & fixture name
Select the manufacturer from the drop-down Manufacturer list. If the manufacturer is not available, scroll to the bottom of the list, select Other..., and type in a new manufacturer name.
Type the fixture model name into the Fixture name field.
Create a description for your fixture
The Description field can contain anything you like. If you make your fixture public, the description appears in the Public Fixture Database window.
Create the fixture modes

Click the New button and enter your mode name (e.g. "3 channel", "Standard", or whatever is appropriate). Repeat for each mode your fixture supports.
Other Fixture Modes features:
- The Duplicate button creates a complete copy of the currently highlighted mode. This is useful where a fixture has a number of almost-identical modes, or where you want to experiment with a temporary mode.
- The Delete button deletes the currently highlighted fixture mode. Be warned, this deletes all channels and channel range definitions within the fixture mode, and the delete cannot be undone. Use with care!
Add channels to each mode
Click the New button to create a new channel. Choose Blank Channel to create an empty channel which you can fill out manually. Alternatively, choose a short-cut (e.g. Dimmer or RGB) to quickly the most common channel types.
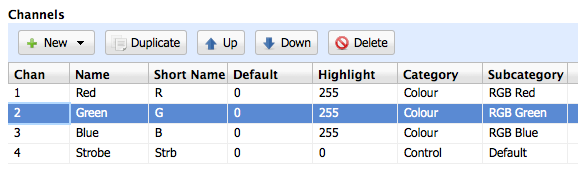
Once your new channel appears in the table, double-click on any field to edit it:
- Name: A description of the channel (e.g. Dimmer, Blue, Gobo). Displayed in the D-Pro programmer window. Not currently used by DMXIS.
- Short Name: A shorter name, displayed where there is limited space in D-Pro and DMXIS. Enter 8 characters or less.
- Default: This is the DMX value (0-255) to transmit when a device is patched but not yet programmed. For example, for a moving head, the default Pan/Tilt values could be 128 to centrally position the head. Not currently used by DMXIS.
- Highlight: This is the DMX value transmitted when the D-Pro Highlight feature is activated for this fixture. For example, the dimmer and RGB values for an LED spot would all be set to 255, enabling that light to be focused on stage when Highlight is activated. Not currently used by DMXIS.
- Category: Drop-down list of channel types (colour, dimmer, control etc). Used by DMXIS and D-Pro to enable advanced editing features.
- Subcategory: Drop-down list of detailed channel types. Contents depend upon the current category selected. This field is important to enable the more advanced features in D-Pro. For example, for an RGBAW flood, the colour channels must be defined correctly in order to enable the visual colour selector in the Programmer window.
Other Channel features:
- The Duplicate button creates a full copy of the currently selected channel.
- The Up / Down buttons allow you to rearrange the channel order.
- The Delete button deletes the currently highlighted channel.
Create the ranges for each channel

Important note: The entries in the Channel Ranges table MUST cover the full 0-255 DMX range (as shown in the Min/Max columns above). If ranges overlap or there are gaps in the 0-255 range, the behaviour of D-Pro or DMXIS will be undefined.
By default, every channel already has a single 0-255 variable range defined. For basic channels which display simple sliders in D-Pro and DMXIS, no further work is required. If the channel is more complex (as discussed in the DMX channel definition section above), you need to add more ranges as necessary.
To add a new range, click Add. A new channel appears, and the editor automatically adjusts the Min/Max fields to make room for the new channel. Double-click on the fields to edit as necessary:
- Min/Max: The range of DMX values that this range covers. Values are inclusive.
- Label: A description of the channel range (e.g. Strobe Speed, Rotation Position). Displayed in the D-Pro programmer window. Not currently used by DMXIS.
- Short Label: A shorter range name, displayed where there is limited space in D-Pro and DMXIS. Enter 8 characters or less.
- Type: Defines the behaviour of the range as follows.
- Variable: Displays a continuously variable slider in D-Pro or DMXIS
- Fixed: Displays a fixed value (in DMXIS) or a drop-down list or radio button (in D-Pro)
- Dimmer: Identifies range as being responsible for dimming the fixture. Only dimmer ranges will react to changes in Master Level (DMXIS) and Grand Master (D-Pro) level changes.
- Blackout: Special range type for DMXIS only. When DMXIS Master Level is at minimum, any blackout ranges are activated. This allows non-dimming fixtures to partially react to fades & manual dims.
A final note on channel ranges
For extremely complex fixtures with dozens of channels, it can be a daunting prospect to develop a fully defined fixture. However, keep in mind that a partially populated fixture is better than no fixture at all. For example, say you are facing a laser control channel with 128 different named "patterns". It can be perfectly acceptable to leave this as a simple 0-255 variable range. In practice, it's unlikely that you would spend time sifting through 128 different pattern names in the DMXIS or D-Pro interface. Easier to just grab the slider and move it whilst watching the real laser.
In other words, if you only have a few minutes to create your fixture, and one is NOT currently available in the public library, it is still thoroughly useful to build a simple fixture consisting of a bunch of simple 0-255 sliders. That fixture can always be enhanced later (adding fully defined channel ranges) without breaking existing D-Pro or DMXIS shows.
Help and support
If you need further assistance, please visit the official support forums or email support@db-audioware.com.